Course Review: Sheriff of Baghdad - 2 Day Vehicle Tactics Class
On March 4-5th, I hosted John McPhee, “The Sheriff of Baghdad” for a Vehicle Defense class. I'd trained with John on two prior occasions. I attended his Video Diagnostic Rifle / Pistol classes in Americus in 2016. I then brought him up to our location later in the year for a second run at it to get feedback on running an optic-equipped pistol and expose some of my instructors to his video diagnostic process. John’s Video Diagnostic courses are excellent. The small group setting and the focus on individual skill development makes for a long but excellent training session. It was during his trip to our Watkinsville location that he noticed one of the cars from training I’d hosted there and stated that he had a similar program. I was excited by the prospect of getting another perspective on working around and from cars.
The round count for the class was given as 400 rounds each for the pistol and rifle. There were three vehicles that we obtained for the class.
In reference to prior training, this was the sixth class I’d taken specifically dealing with vehicle defense / counter-ambush. Three of those previous courses were specifically geared towards instructor development and how to research and create a vehicle defense program.
Day 1:
The first day of class began informally. Class was due to start at 9:00, but due to some late arrivals, we didn't begin spinning-up until approximately 9:45 or so. We were told that the first day of the class would mainly deal with the ballistics. We were encouraged to grab anything that we had on hand ammo-wise so that we could test penetration through the vehicle. There was no discussion or safety brief of any kind, so issues such as range rules or a medical plan were never covered.
The first order of business was to move to a vehicle placed length-wise along the berm (a Volvo S70 station wagon) and begin the ballistics demo. John drew out squares on the vehicle and labeled them with each grain weight and bullet type. While doing this, he asserted that “bullets zip right through these cars.” He supported this with multiple stories about engagements overseas that involved .50 caliber weapons. In his words, "the vehicle isn't cover."
We began to go through the pistol and rifle ammunition on the Volvo, each in a specific square. After each of the rounds, we'd check the opposite panel and glass for signs of penetration or deviation. This system for checking bullet penetration and ballistics was repeated on the rear passenger door and then the rear cargo compartment of the Volvo. Each student would come up with his round, fire one round into the box, the class would check the results, and then we'd repeat. This was a lengthy process due to examining and diagramming both panels after each shot. After getting done with a panel or door, the class would take a break that lasted anywhere from 15-30 minutes. The progression went as follows:
- Front passenger door (Volvo), 19 rounds
- Rear passenger door (Volvo), 7 rounds
- Rear passenger compartment (Volvo), 5 rounds
- Pillars A,B,C,D (Volvo), 4 rounds
- Both driver side doors (Kia Rio), 6 rounds
- Driver side pillars (Kia Rio), 3 rounds
- Side mirror (Kia Rio), 1 round
- Windshield into the passenger compartment (Kia Rio), 4 rounds
- Retrieve Rifles and ammo
- Front passenger door (Volvo), 7 rounds
- Rear passenger door (Volvo), 7 rounds
- Rear passenger compartment (Volvo), 5 rounds
- Passenger side pillars (Volvo), 4 rounds
By roughly 3:00 PM, the class as a whole had fired 71 rounds of ammunition (I’d fired three). We had spent three or more hours of downtime telling war stories and taking breaks.
In regards to the ballistic data, contrary to “zipping through the car”, most rounds failed to penetrate both front passenger doors of the Volvo. The further back on the vehicle we went, a slightly higher percentage of rounds went through the entire vehicle. None of the rounds penetrated the pillars and went through to the other side. When a round did penetrate through the vehicle, we observed a significant deviation in trajectory after passing through the first panel.
John explained that the vehicle is stronger towards the front due to the reinforcement of the frame. John’s takeaway from that was to shoot through the windows on vehicles that were low, such as sedans. On high vehicles such as trucks, you should shoot the door, but aim high to avoid the internal pillars and support.
After that discussion, John said that we’d shoot up the engine block to see how that would stop rounds. The wheel rotors and the axles were excellent cover as they were solid and metal. One of the students was instructed to put a round into the strut of the passenger side front tire from a distance of about 5 yards. Upon shooting, the round ricocheted and struck him in the stomach. There was immediate apparent bleeding and a cut in his shirt. The student said that he was hit, cleared his gun, and walked off the line. The instruction continued without pause until I suggested we take a break and check on the person who had just been injured.
After a break to ensure that the wound was superficial, we moved onto deflating the tires. We discussed factors that would influence the rate at which tires deflated, such as the internal components of some run-flats vs. vehicles with more robust off-road tires. We shot a number of the tires with pistol and rifle rounds. Some deflated rapidly, while some took a minute or more to go down.
Day 2:
Day 2 began with tactics for working a vehicle. John’s tactics place speed of the shooting above all other concerns such as using the vehicle for cover or working angles. Here’s the condensed version:
- The Vehicle is the X. If you can drive away from an ambush, do so.
- If you cannot drive away from an ambush, always exit the vehicle when practical, even on the side from which you’re taking fire. They’re trying to kill the vehicle, not the person in it.
- When fighting near a vehicle, always do so from arm’s length or more due to bullet fragmentation and rounds skipping off the panels. You should never get closer than arm’s length under any circumstances.
- Don’t use any part of the vehicle for cover. Bullets zip through that. Shoot over a low vehicle’s roof or shoot through the windows. Leaning out from the pillars was slow and you needed to get kill shots quickly. Shoot through the side windows as well as it’s an open space and you won’t hit the frame.
- Never purposely taken any position in the fight but standing. If you go prone, you’ll be flanked and die. You can’t see under the car well, and it’s also too confusing to fire a weapon at a 9:00 or 3:00 orientation due to offset.
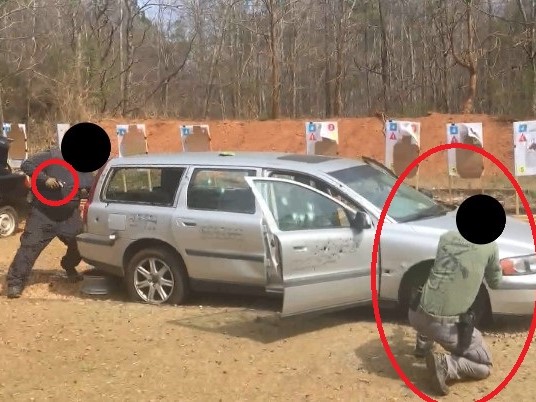
Here’s an example of properly working the car:
Once we covered those areas, we began working on how to get out of the vehicle. We did a few dry runs, mainly showing us how to work the seat belt, open the door, and get out with our heads over our feet. We worked that dry before we shot 2 rounds each from within the passenger compartment of the vehicle. John explained that when taking fire, the priority was to get the seat belt of and exit if at all possible. You could draw the weapon after exiting. However, there was a different process if you needed to engage prior to the exit.
If shooting immediately was necessary, the process was:
- Draw the weapon and fire through the windshield.
- Re-holster the weapon OR drop it on the dashboard if you have a spare.
- Get out of the seat-belt and exit
- Run to the rear of the vehicle
- Access a firearm
- Shoot back
The re-holstering prior to exiting the vehicle was particularly concerning as I carry my pistol appendix when not on duty. Prior to this class, I’ve bailed out of vehicles with rifles and pistols using muzzle up or muzzle down as appropriate. I've also manipulated my seat belt and firearm at the same time, but with different hands and with muzzle discipline. However, John maintained that it was too difficult to do that safely. There was, in fact, no discussion of how to access the firearms while bailing out of the vehicle.
At noon on day 2, we began to shoot the scenario stages. Prior to this, my total round count was 5 (3 from ballistics demo, 2 from shooting inside the car to get exposure to that). The first rounds students fired in the class that required muzzle discipline or awareness were made at speed, negotiating a new skill set. There were some noticeable safety concerns during this part of the class, and I counted 7 separate times when a student pointed the muzzle of their gun at either their training partner or the entire line. This was caused by anything from complete lack of muzzle discipline when moving towards the rear of the car, to getting snagged on a piece of the vehicle and spinning 180* to face the crowd with a finger on the trigger. None of these incidents caused a discussion about range safety or resulted in any type of discipline or coaching for the offender, in spite of numerous folks yelling “muzzle” when it occurred.
Bailout drills incorporated:
- Engagement of targets through the front windshield and bailing out (after re-holstering)
- Moving laterally across the row of cars using bounding overwatch
- Engaging targets to the rear of the vehicles
Each person performed the drill twice to give exposure to the mechanics from the passenger and driver sides of the vehicles.
After three hours of drills, everyone had shot approximately 60 more rounds of rifle and pistol. We then tabled the rifles and discussed how to perform an L-Ambush. After that, we finished the class with information on how to best disable a vehicle. The vehicle disablement information was the first time I had encountered that content in a course, and plan to work with that once I find a suitable vehicle that had a working engine that can be shot.
Day 2 ended with a recap of what had occurred and giving feedback. When it was my turn, I explained that I would have liked more attention paid to the safety aspects of class. Specifically, prior to bailing out of the vehicles, I would have liked to work on methods for keeping the muzzle indexed in a safe direction. I also referenced the number of times I had observed muzzle safety violations during the scenarios. John stated that in “the real world” people are going to get covered with a muzzle, and that he didn’t want to add any “artificiality” to the training by using those retention positions. He further went on to differentiate between “sweeping” and “flagging” people with the muzzle. “Flagging” is an egregious offense that occurs when you point a muzzle at someone’s head or chest (vital areas) and is not ok. “Sweeping” is when you cover that person’s legs or feet with the muzzle on your way by and is going to happen.
I then explained that I had been “Flagged” seven times. I also stated that as a cop, I couldn’t just point my gun at a bunch of people who didn’t need to see my muzzle on my way to engaging a threat, and felt that a retention position such as Sul or High-Port would have allowed people to move in confined spaces without pointing muzzles at non-threats. John’s disagreed, stating that if anything, the range logistics should have been set up better so that the onlookers wouldn’t be standing behind the vehicles. That way, when students were working drills, people not involved would be clear and the students could let their muzzles go wherever. Rather than making a safe shooter who took their muzzle direction into account, the solution was range management.
Conclusion:
Ultimately, I felt as if the content was modeled more for an overseas encounter where .50 caliber rounds and guys carrying a SAW were prevalent, rather than for domestic law enforcement or civilians who would be fighting from a vehicle. During the ballistics demo, we saw most of the rounds stop or deviate in the surfaces of the car, which would lead me to believe that there is some value in using those surfaces for temporary cover or concealment. However, the tactics in this class had you disregard the vehicle completely based on stories of .50 caliber rounds or automatic weapons fire cutting vehicles apart overseas. While I’m sure that happens, I’ve not seen many instances of that occurring state-side, so that tactics seemed at odds with a state-side setting. Even the idea that the bad guy is trying to kill the car contradicts what we see in law enforcement shootings. Most times, the goal is to injure or assassinate an officer who just so happens to be in or around a vehicle.
When I leaned out from around the pillars at a crouch or kneeling, I was told that it was costing me time and that the car was no good. Better, I was told, to shoot over the top or through the windows leaving myself in the center of the void with nothing between me and the bad guy. After the class, another officer and I shot the B-pillar of the Volvo to see how many rounds it would take to penetrate. It took 97 rounds of Federal 55 grain FMJ fired at close range to penetrate the FIRST pillar. When rounds did finally make it through the first B-pillar, their path deviated, and they began going through the side windows around the pillar on the opposite side. While the pillar itself isn’t very wide, placing two of them between me and incoming fire generally gives me 10-14 inches of protection that’s good for an unknown number of rounds. That’s a lot like a SAPI plate that goes the entire height of the vehicle.
There was some good information in the class as far as how to set up your vehicle prior to an engagement. Examples range from where to stage a seat-belt cutter, to how to ready the patrol rifle if you don’t have a rack, etc. were things that I felt were useful. That information, as well as the information on how long it takes to disable a vehicle by shooting the engines or tires was also interesting.
My major complaints about the class involve downtime and safety. There was a lot of downtime during this class. All told, at least 50% of the time on the range was spent on war stories. That ate up a lot of the time available for instruction and accounted for the fact that I shot a combined total of 100 rounds or less in a projected 800 round class. As far as the safety aspect goes, I do not think it's acceptable to point my weapon at any person I'm not legally and morally justified in shooting. The “sweeping” vs. “flagging” discussion should never have occurred because the shooters in the class should have been given the tools and knowledge to be safe prior to any live-fire exercises being conducted.