Rifle ZERO and Mechanical Offset
WHAT IS A RIFLE ZERO?
Everything you do with the rifle is based upon your zero. I once spent multiple hours with Dave Harrington as he highlighted the importance of the zeroing process and its cumulative effect on your effectiveness with the rifle. Understanding my zero and the difference between my optic's height in relation to the muzzle has proven invaluable when shooting from unstable and non-traditional positions. If you train with folks like Chase Jenkins and William Petty, you'll appreciate knowing this information before their courses, as you'll be shooting through, around, and under anything they can think of. With that said, many people tote a rifle around for work or play without a basic understanding of how to zero and map the external ballistics (bullet path) of their firearm.
Point of Aim (POA) / Point of Impact (POI) will change due to distance to the target, orientation of the weapon, your choice of ammunition, mechanical offset, and other factors. So - a few things to ask yourself:
- What are the two distances where your bullet will strike the target in the place your optic or sights are centered? (And there are two).
- How well have you learned and documented how your rifle will perform closer or farther than your zero distance?
- How does the bullet path change when you have the gun turned on its side or at an odd angle, as might happen when you're using cover or forced into a position of necessity?
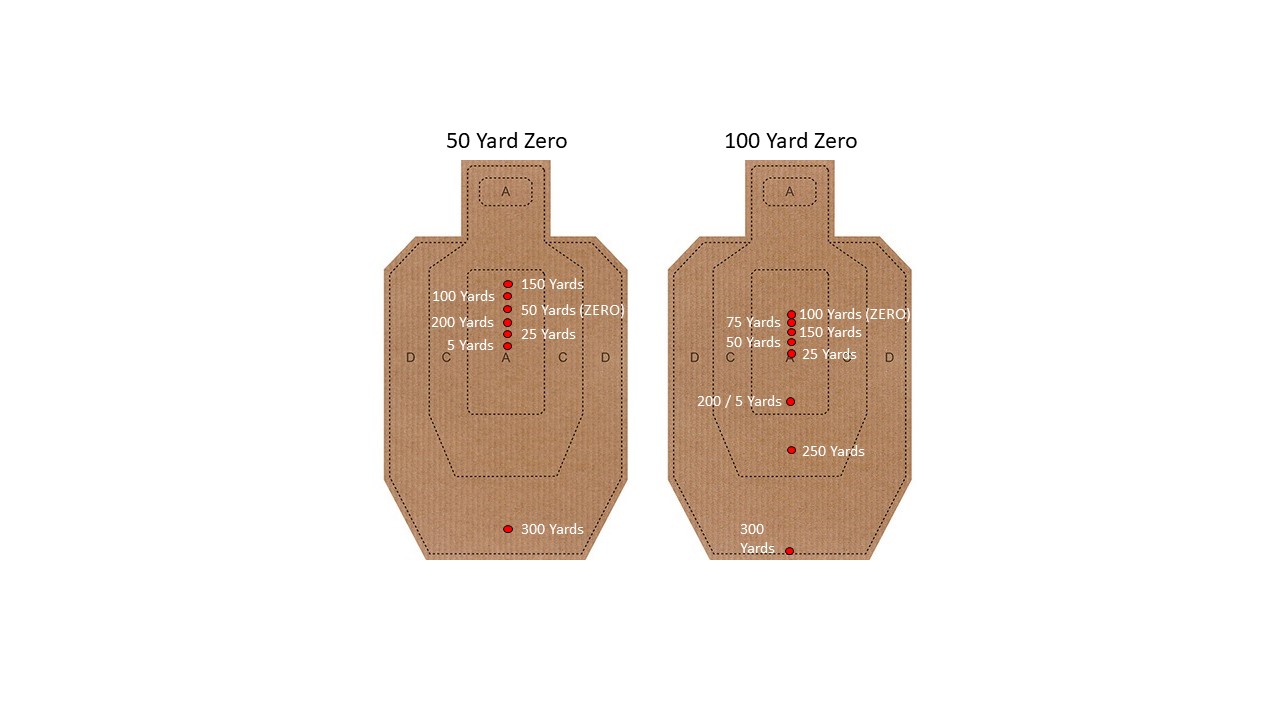
When I changed the optic mounts I use on my rifles, I went through a zero and offset mapping process with each of them. I use a 50/200 yard zero, which means that the rounds fired from the rifle will impact at the point my sights / dot are aiming at 50 yards and again at approximately 200. If you're scratching your head at this, just understand that when you're looking through the sights, your rifle's barrel is located about 3 inches below the optic. That difference between the height of the optic and the height of the bore is called mechanical offset. The rifle's barrel is tilted very slightly up to cause the rounds to rise to the aiming point. Beyond that point, they will rise a bit more, then start coming down as gravity drags it down. The second time the bullet will pass my sight line is the approximate 200 yard range. Moving farther out, the bullet will continue to drop until it hits the ground. For my purposes, a 50/200 zero allows me to use my dot for an acceptable hit (6" plate) anywhere from 25 to 300 yards without adjusting my point of aim. It won't be a bulls-eye, but it'll hit a threat without much need to think. Further explained, my zero means that the rounds will be low between 0-50 yards, high from 50-200 yards, and low beyond 200. The two points where I'm going to hit exactly what I'm aiming at are 50 and 200 yards.
There are other zero options out there, and I encourage you to find the one you like best. This one is vanilla and works well for what I do in work or play. For precision rifles, I generally set a 100 yard zero and then dial my adjustments manually based on range, wind, and other factors.
This graphic is an example of how your zero distance will change the point of impact on your target at different ranges. As always, you need to verify the external ballistics / bullet path of your rifle with your specific equipment setup and the specific ammunition. This should get you close though.
SETTING A ZERO:
- Set the rifle up on a stable platform to validate the rifle and ammunition combination, NOT the skill of the shooter. At a minimum, this means a bag rest. When I set up the rifle, the goal is to have it aligned with the target on the bag without my influence. All I'm doing is holding it steady and pressing the trigger. If you're having to support the gun with your muscle, you should alter your bag setup to properly rest the gun.
- Mount the targets at the same height as the rifle. It seems like a small thing, but setting a target a foot or two higher than the gun will have an effect. It may be a small effect, but it will still matter when the shots count. I generally use the top target for roughing in the zero, then the lower one for making the fine adjustments.
- Establish your zero at the KNOWN distance that makes sense for your environment and optic. A laser range-finder or a measuring wheel make sure you're not just "close enough" to the intended range. I'm also looking for each shot taken during the zeroing process to be as perfect as I can get it. If you know you pulled a shot with a bad trigger pull, call it and discount that from the zeroing process.
- If space allows, determine the SECOND KNOWN DISTANCE where the round will once again strike the target in the place that the sights / optic are aimed.
MECHANICAL OFFSET (STRAIGHT UP AND DOWN):
Mechanical offset is the difference between where your Sights / Optics are mounted and where the muzzle is. In most cases, there's a 2.5" - 3.5" difference as the sights are much higher than the barrel. Your optic, mounting hardware, and the gun itself will all contribute to this offset distance. When you Zero, you're basically orienting the gun's muzzle UP at the proper angle to direct the bullet to the sights at a specific distance. At close range, you should expect to see the bullet impact the target much lower than the sights, which becomes important in CQB encounters. Knowing your offset can be the difference between making and missing a shot.
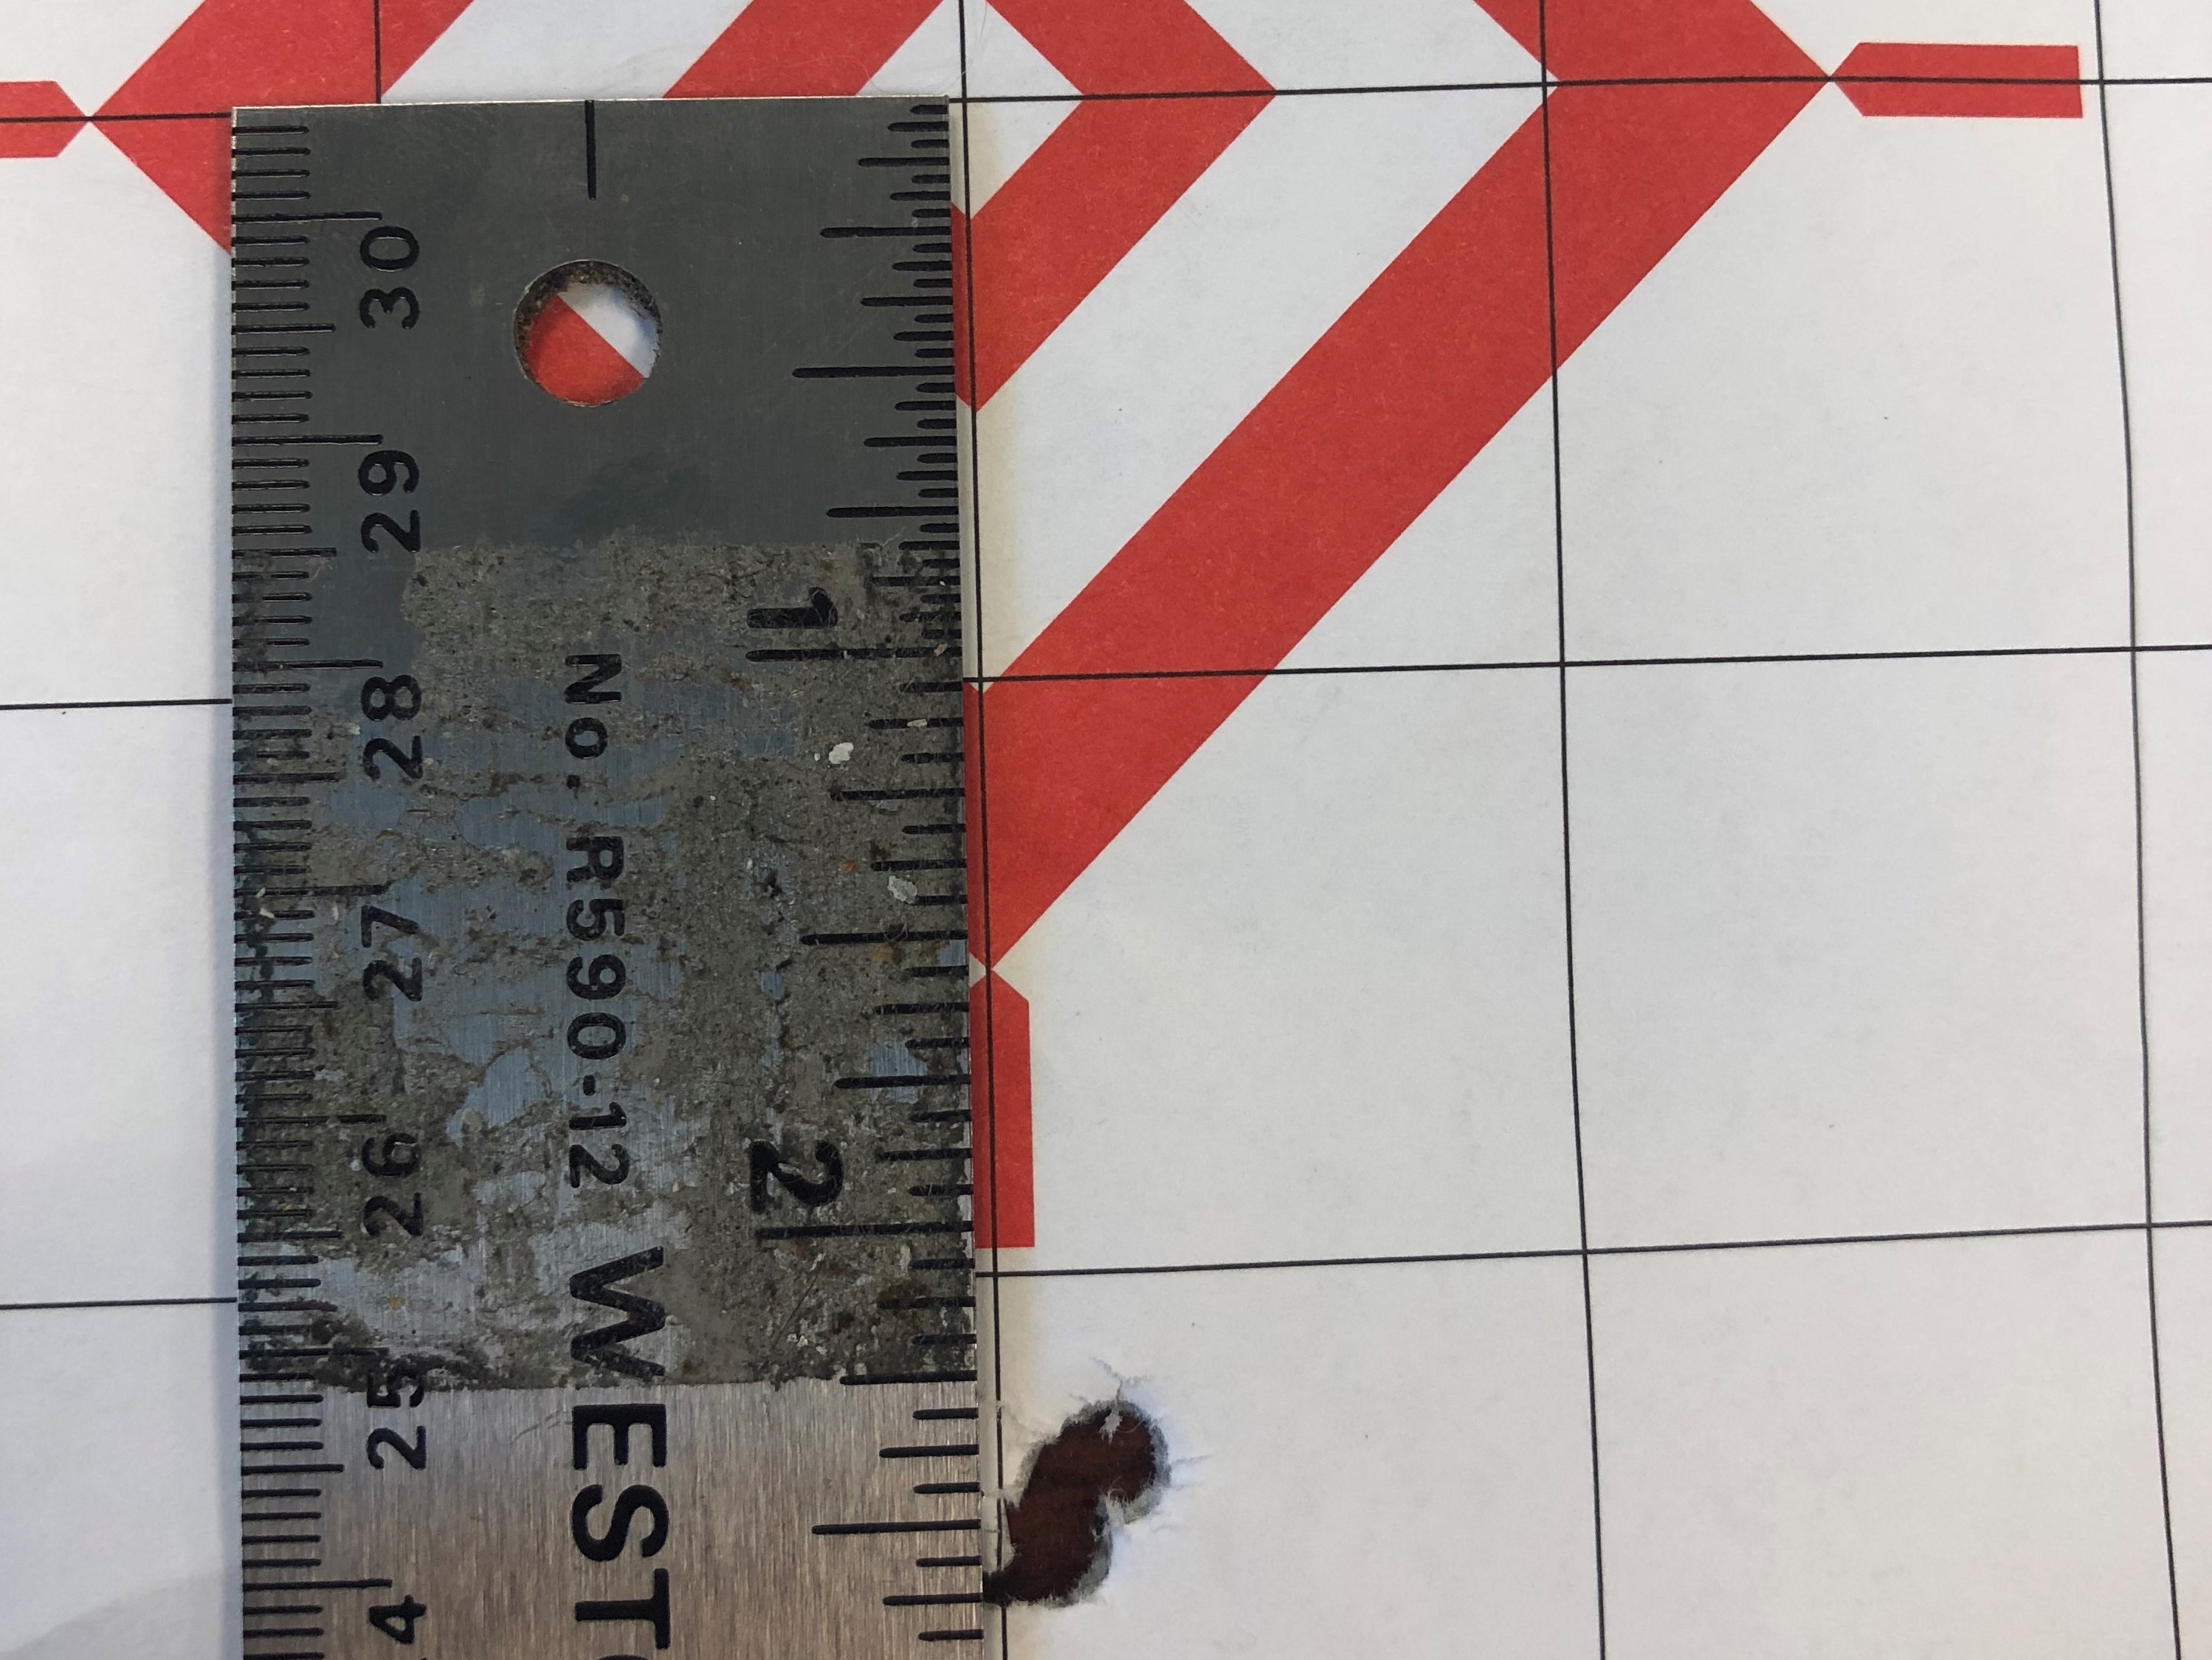
- Set the rifle in a stable position and move the TARGET in relation to the gun. This will keep things as consistent as possible. I use the same measuring wheel / laser range finder to set my distances.
- Using the center of the target as my point of aim, I then shoot groups at 5, 10, 15, 20, and 25 yards.
- I collect the target and map the deviation from the center at the various distances. This will change as we move closer or further from the target. (5 yard offset shown below).
MECHANICAL OFFSET (ORIENTATION OF THE GUN):
Finally, you need to understand that the gun will behave differently when it's lying on its side. If we are shooting through a port or underneath something, it will sometimes be required to turn the rifle to get our sights on the target or get the gun under an obstruction. When you do that, realize that the gun's muzzle is no longer pointing UP to rise to the target, but is instead pointing LEFT or RIGHT. Here's a simple rule to follow:
- If you're closer than your first ZERO distance, the round will strike the target equal in height to the sights / optic, but will strike to the magazine side because the bullet is still trying to "rise" to the zero.
- If you're farther away than your first ZERO location, the round will strike slightly lower than the optic, but will also favor the side of the gun where the optic is located because the barrel is still angled in that direction.
As an example, let's imagine that you shooting from your right shoulder and looking through the gun's sights. In this example, the gun has been rolled 90* to the right, so that the optic is facing the RIGHT side of the range and your magazine is facing the LEFT side of the range. Your ZERO is set at 50 yards. The rounds will now still have a similar mechanical offset to when the gun was straight up and down that we'll plug into the equation.
- If the target is CLOSER than 50 yards, aim at the same HEIGHT that you want the round to hit, but favor the target to the OPTIC / RIGHT side. The mechanical offset means that before we reach 50 yards, the rounds will be somewhat to the LEFT of where you aim because it's trying to meet your zero point.
- If the target is BEYOND 50 yards, aim slightly high to compensate for gravity / bullet drop, and favor the target to the MAGAZINE / LEFT side of the range. Because you are past your zero distance, the bullet will have passed the zero spot and will have continued moving to the RIGHT, so we need to adjust for that. Also, because the muzzle is no longer oriented with an upward rise, the round will start falling as soon as it leaves the gun due to gravity.
CONCLUSION:
The best way to understand this is to go do it. It may seem like you don't need to know this, but there are some serious reasons to have a grasp of where the bullet will go. For example, if I have a bag guy with a hostage between us at approximately 5 yards, I need to understand that the bullet will strike 2.5" lower than the dot when I press the trigger. At 25 yards, my round will only be about 1" low. If I get that wrong, I may hit the wrong person.
For me, this process has also recently highlighted the fact that at 40 years old, I've developed an astigmatism. I actually discovered this while performing the re-zero / offset mapping process with these rifles. Whereas I once saw a clean dot, I now see what looks like a comet moving from low left to high right in the center of the reticle. Suddenly, the specific part of the dot I focus on, and the brightness setting of my optic, produce drastic changes in my POA / POI. Ironically, as I swapped all my gear over to new hardware, my eyes were starting to move away from making my optics the ideal choice for me.